Installing hinges on cabinet doors is an easy and effective way to update the look of your cabinets. Here is a step-by-step guide on how to put hinges on cabinet doors.
How to put Hinges on Cabinet Doors
1. Choose the right type of hinge for your cabinets: There are different types of hinges to choose from, such as concealed, surface-mounted, and European hinges. Make sure to select the type that fits your cabinet doors and your personal preference.
2. Measure and mark the placement of the hinges: Use a ruler to measure and mark the position where you want to install the hinges on both the cabinet door and the cabinet frame.
3. Pre-drill the screw holes: Use a drill and a small drill bit to pre-drill the screw holes on the marked spots of the cabinet door and the cabinet frame.
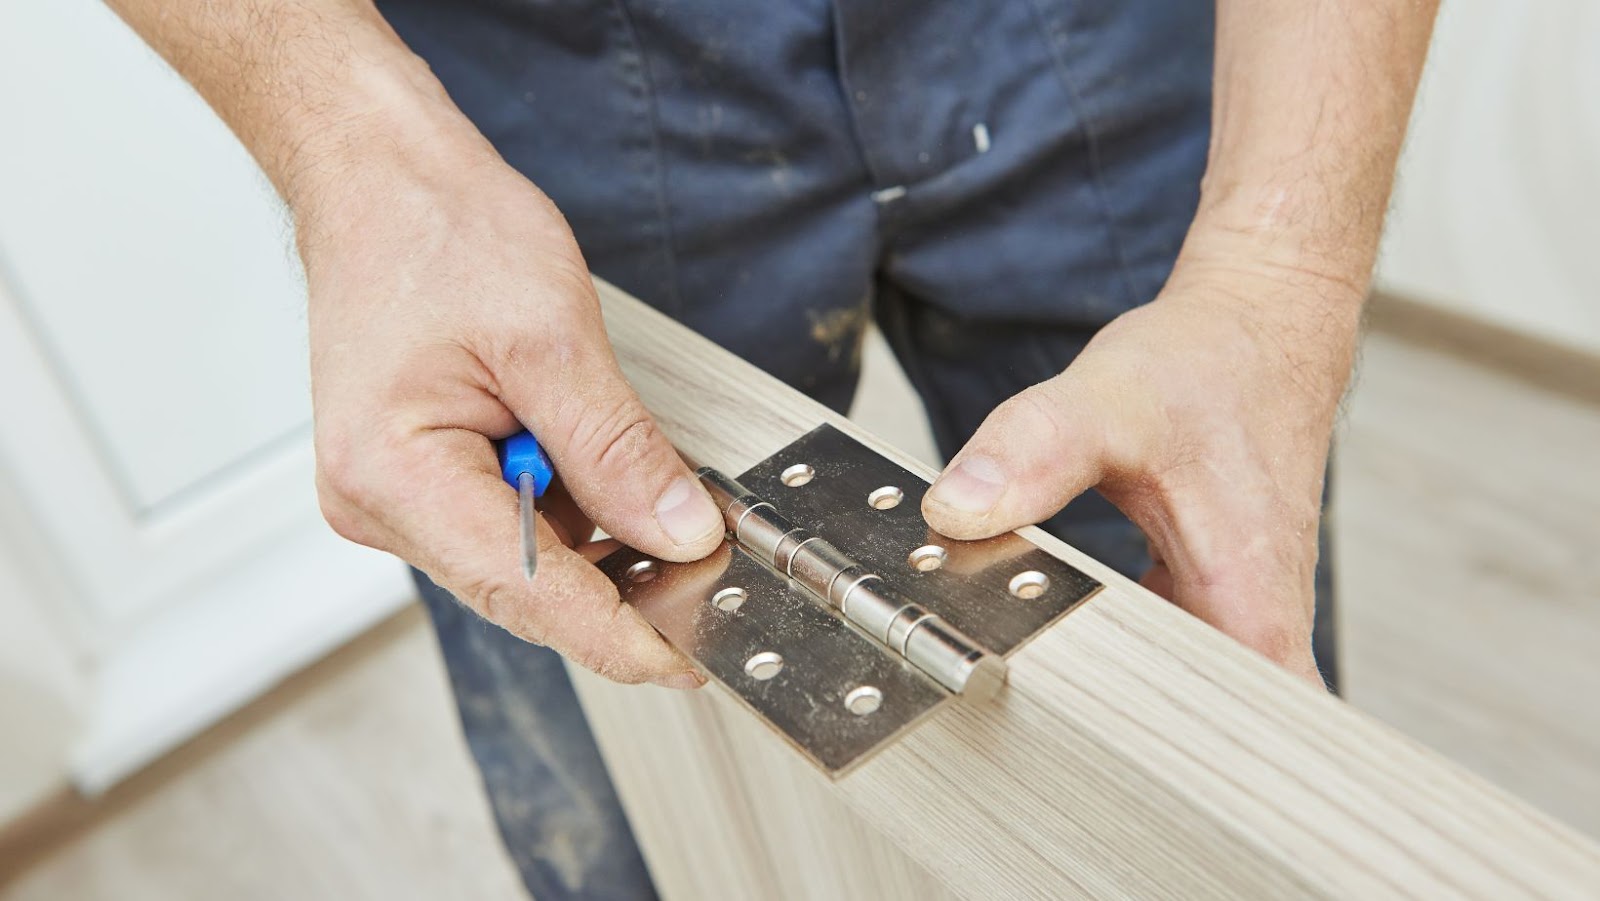
4. Attach the hinges to the cabinet door: Line up the hinge arm onto the pre-drilled holes on the cabinet door and use a screwdriver to secure the hinge in place with screws.
5. Attach the hinges to the cabinet frame: Line up the hinge plate onto the pre-drilled holes on the cabinet frame and use a screwdriver to secure the hinge in place with screws.
6. Test the hinges: Open and close the door several times to test the hinges’ quality and adjust them if needed.
Pro Tip- To ensure even placement of hinges on multiple cabinet doors, create a jig from a scrap piece of wood that matches the door’s height to mark the holes identically every time.
Gather the Necessary Tools and Materials
When it comes to installing hinges on cabinet doors, having the right tools and materials is essential for the job. You will need to gather the necessary hinges, screws, a screwdriver, and a drill. These items are all essential for installing the hinges properly.
Let’s look at what else you will need to get the job done.
Screwdriver
To install hinges on cabinet doors, you’ll need a screwdriver along with a few other essential tools and materials.
Gather the following items before you begin:
- A power drill (preferable) or a hand drill if you don’t have a power drill,
- Measuring tape,
- Pencil or pen,
- Cabinet hinges (make sure it is of the correct size for your cabinet doors),
- Screws (these usually come with your hinges), and
- Cabinet doors.
Be sure to read the manufacturer’s instructions that come with your hinges to ensure you install them correctly and work safely.
Measuring tape
Installing hinges on cabinet doors requires precise measurements, which can be achieved with the help of a measuring tape. Before starting the installation process, gather the necessary tools and materials, including the measuring tape, drill, screws, and hinges.
Here are the steps to follow:
1. Measure the height of the cabinet door and mark the hinge placement on the door frame using the measuring tape.
2. Align the hinge and drill pilot holes for the screws.
3. Screw in the hinges tightly and ensure they’re in the proper position.
Repeat the process for each hinge on every cabinet door.
Using a measuring tape ensures that your hinges are evenly placed for a seamless and functional cabinet door.
Hinges
Installing hinges on cabinet doors can be a simple and easy process when you have the right tools and materials on hand. Here are the steps to follow:
Gather the necessary tools and materials, including a drill, measuring tape, screws, screwdriver, and the hinges themselves.
Determine the placement of the hinges on the cabinet door using your measuring tape and pencil.
Use your drill to make pilot holes for the screws in the designated hinge placement spots on the door.
Align the hinges with the pilot holes and attach them to the cabinet door using the screws and screwdriver.

Test the door to ensure smooth operation, adjust the hinge placement if necessary, and tighten any loose screws.
By following these steps, anyone can successfully install hinges on cabinet doors and upgrade the look and functionality of their cabinets in no time.
Drill
Before you start installing hinges on your cabinet doors, make sure you gather all the necessary tools and materials. Here’s what you’ll need:
Tools:
- Power drill
- Drill bits
- Screwdriver
- Measuring tape
- Pencil
- Level
Materials:
- Hinges
- Cabinet doors
- Screws
Here are the steps to follow:
- Measure and mark where you want to install the hinges on the cabinet door with a pencil and level.
- Use the drill bit to make a pilot hole for the screws in the cabinet door.
- Line up the hinge with the pilot holes and screw it into place using a screwdriver.
- Repeat the process for any remaining hinges and cabinet doors.
Make sure to attach each hinge to the corresponding door before attaching the doors to the cabinet.
Determine Hinge Placement on the Cabinet
Installing hinges on cabinet doors is an easy process but needs careful consideration of the hinge placement. Knowing where the hinges go and how to put them on the cabinet door is a key step in the process.
Let’s explore this in more detail and understand the importance of proper hinge placement.
Measure and Mark Hinge Placement
Before installing hinges on cabinet doors, it’s crucial to determine the hinge placement and mark it accurately to ensure a smooth installation process. Here’s how you can do it:
1. Place the door on a flat surface and position the hinge where you want it to be installed.
2. Use a measuring tool, such as a tape measure or ruler, to ensure the hinge is placed at the same distance from the top and bottom of the door.
3. Once you’re satisfied with the placement, use a pencil to mark the location of the hinge on the door.
4. Repeat the process for the second hinge, ensuring that the distance between the two hinges is equal.
5. Before drilling the holes for the screws, double-check the hinge placement and adjust it if necessary.
6. Use an appropriate tool, such as a drill or screwdriver, to install the hinges according to the manufacturer’s instructions. Remember to align the hinges properly and adjust the tension to ensure the door opens and closes smoothly.
Verify Alignment with Door
Before installing hinges on your cabinet doors, it’s essential to verify their alignment with the door for a seamless installation process. Here’s how to determine hinge placement on your cabinet doors:
Hold the cabinet door up to the cabinet frame and mark where you want the hinges to attach. Use a square or level to ensure the marks are level and plumb. Measure the distance from the top and bottom of the door to the top and bottom of the frame where the hinges will attach. Transfer these measurements to the cabinet door, making sure they are the same distance as the frame. Pre-drill the screw holes on the cabinet door using a drill bit slightly smaller than the screws you will use. Install the hinges on the cabinet door and then the frame, making sure they are aligned and level.
Pro Tip: Use a self-centering hinge drill bit to make hinge installation faster and more accurate.
Repeat for Remaining Hinges
Once you’ve determined the correct placement for the first hinge on your cabinet door, it is time to repeat the same process for the remaining hinges.
Here are the steps to follow:
- Place the second hinge on the designated spot on the cabinet door or frame.
- Align the hinge to make sure that the pin is centred and the mounting plates are perpendicular to the door or frame.
- Use a pencil to mark the spots where you’ll drill pilot holes for the screws.
- Remove the hinge and drill pilot holes on the marked spots.
- Attach the second hinge to the door or frame using screws.
- Repeat the process for any additional hinges, making sure that the hinges are evenly spaced and aligned.
Pre-Drill Holes and Install Hinges on Cabinet
Installing hinges on cabinet doors is not a difficult task, but it does require a few precise steps. To begin, you will want to pre-drill the holes for the screws before mounting the hinges. The pre-drilling process is necessary to ensure a secure fit.
When pre-drilling, it’s important to use the correct size drill bit for the particular hinge that you are using. Once the holes are pre-drilled, then you can start the process of mounting the hinges.
Pre-Drill Holes for Screws
Pre-drilling holes before screwing in hinges is a crucial step in installing cabinet doors to ensure a secure and stable fit. Here are the steps to follow:
Hold the hinge in position on the edge of the cabinet door or frame where you want it to be installed. Use a pencil or marker to mark the screw hole positions on the wood.
Remove the hinge from the wood and select the appropriate drill bit size based on the size of the screws to be used. Use a power drill to drill pilot holes into the wood at the marked positions, making sure to drill straight down into the wood.
After pre-drilling all the necessary holes, attach the hinge to the wood using screws, making sure they are flush with the surface of the hinge. Follow the same process for installing hinges on the cabinet frame, and then attach the cabinet door to complete the installation process.
Align Hinge with Marking and Drill Screws
Installing hinges on cabinet doors can be challenging, but following simple steps can make it a breeze. Pre-drilling holes and aligning hinges with marks are two critical steps that can save you time and minimise the risk of damaging your cabinets.
Here’s how to install hinges on cabinet doors:
1. Choose the right type of hinges for your cabinet doors.
2. Create a guideline to mark your cabinet doors where you want to install the hinges.
3. Using a small drill bit, pre-drill holes where you’ve marked the guideline.
4. Place the hinge in the door mortise and align it with the marking.
5. Drill the screws into the pre-drilled holes to attach the hinge to the cabinet door.
Repeat these steps for the remaining hinges on your cabinet door to ensure a secure fit.
Repeat for Remaining Hinges
When installing hinges on cabinet doors, it’s crucial to pre-drill holes for accurate and secure installation. Here are the steps to follow to pre-drill holes and install hinges on your cabinet doors:
Position the hinge on the door or cabinet frame and mark the screw holes with a pencil or marker.
Use a drill bit that’s slightly smaller than the screws you’ll use to secure the hinge in place.
Place the drill bit on the mark and drill a shallow hole, being careful not to drill too deep.
Repeat the process for the remaining screw holes.
Once all the holes are pre-drilled, align the hinge with the holes and use screws to secure it in place.
Repeat the process for the remaining hinges until all your cabinet doors have been installed. Pro Tip: Use a leveller to make sure the hinges are evenly spaced and aligned.
Install Hinges on the Cabinet Door
Installing the hinges on the cabinet door is an important part of having a secure and attractive kitchen. The right hinges can make all the difference between a kitchen that looks great and one that looks drab.
This step-by-step guide will show you how to safely attach hinges to your cabinet door. You’ll learn how to select the right hinges as well as how to install them correctly.
Align Hinge on the Door and Mark Holes
Installing hinges on cabinet doors can be a little tricky, but it is an essential process to make sure that your cabinet doors open and close smoothly. Here’s how to do it right:
Step 1: Determine the number of hinges needed based on the size and weight of the door.
Step 2: Align the hinges on the door and mark the holes with a pencil or a marker.
Step 3: Pre-drill the holes at the marked spots with a drill bit that is slightly smaller than the screws you will be using.
Step 4: Install the hinges on the cabinet frame using screws and a drill.
Step 5: Fit the cabinet door into the frame and attach the hinges to the screws on the frame.
Pro tip: Use a drill bit stopper to avoid drilling too deep and damaging the cabinet.
Pre-Drill Holes for Screws
Pre-drilling holes for screws is a crucial step when installing hinges on cabinet doors. Here’s how to do it:
Begin by marking where you want the hinge to be installed on the door and cabinet.
Take a drill bit that is slightly smaller than the screws you will be using and use it to drill a hole at the marked spot. This hole serves as a guide for the screw and will prevent the wood from splitting.

Align the hinge with the holes, place the screws in the pre-drilled holes, and use a screwdriver to tighten them. Remember to test the door to ensure it opens and closes properly.
By pre-drilling the holes, you can install the hinges more efficiently and with less risk of damaging the cabinet or door.
Pro Tip: Use the appropriate size of drill bit to match the size of your screws, and drill straight to create a clean hole for the screw to go in.
Align Hinge with Maring and Drill Screws
Installing hinges on cabinet doors is a straightforward process that can be accomplished with a few basic tools and some patience. Here’s how to put hinges on cabinet doors:
1. Start by choosing the right hinge for your cabinet.
2. Measure and mark where you want the hinge to go on the cabinet door and the cabinet box.
3. Align the hinge with the markings and drill screws into the pre-existing holes in the hinge.
4. Tighten the screws with a Phillips-head screwdriver or cordless drill, being careful not to over-tighten and strip the holes.
5. Repeat the process for the remaining hinges.
With these steps, you can quickly and easily install hinges on cabinet doors, ensuring that your doors are secure and properly functioning. Pro tip: Use a level to ensure that the hinges are lined up vertically for a clean and polished installation.
Repeat for all Hinges and Doors
Installing hinges on cabinet doors is an essential part of cabinet assembly. Proper installation ensures a smooth and seamless operation of the cabinets.
Here are the steps that you should follow to install hinges on the cabinet door:
1. Gather the necessary tools such as a drill, drill bits, screws, and of course, the hinges.
2. Measure and mark where the hinge should be installed on the door and the cabinet. It’s crucial to be as precise as possible in this step.
3. Pre-drill holes for the screws on the marked positions.
4. Align the hinges on the markings and attach them to the door and cabinet using screws.
5. Once attached, carefully test the cabinet door’s movement and adjust the hinges if necessary.
Repeat the process of installing hinges on all doors and ensure they open and close correctly.
Adjust Hinges for Proper Alignment and Operation
Important to any successful cabinet door installation is the proper alignment and operation of the hinges. To get the best results, it’s necessary to adjust the hinges to the appropriate specs.
In this article, we’ll explain the process of how to adjust your cabinet door hinges for proper alignment and operation.
Adjust Side-to-Side, Front-to-Back and Height Alignment as Necessary
Adjusting hinges for proper alignment is essential for the smooth operation of cabinet doors. Follow the steps below to adjust your hinges:
1. Side-to-side adjustment: Use a Phillips screwdriver to loosen the mounting screws on the hinge. Slide the hinge left or right as needed to align the door with the cabinet opening. Tighten the screws once you have achieved the desired positioning.
2. Front-to-back adjustment: Locate the screws on the mounting plate attached to the cabinet. Use a Phillips screwdriver to loosen the screw and move the plate closer or farther from the cabinet opening. Tighten the screw once you have achieved the desired depth.
3. Height adjustment: Locate the screws on the mounting plate attached to the door. Use a Phillips screwdriver to adjust the height of the door by turning the screws counterclockwise to lower the door and clockwise to raise it.
Once all adjustments are complete, test the door’s operation to ensure correct alignment and proper functioning. Pro Tip: Always adjust one hinge at a time to ensure that your adjustments do not affect the door’s balance.
Test Operation of the Cabinet Doors
Before installing hinges on cabinet doors or making adjustments, it is crucial to test the operation of the doors for a proper fit and alignment.
Here are the steps to follow:
Close the cabinet doors and check if they are level and flush against the cabinet.
If not, check for any obstructions, such as hinges or screws, that may be causing the misalignment.
Loosen the screws on the hinges using a screwdriver and adjust the hinge position until the door is level and flush.
Re-tighten the screws and check the operation of the doors again.
Repeat the process as necessary until the doors are correctly aligned and operate smoothly.
Pro Tip: Use a carpenter’s level to ensure the doors are level and flush. It will make the installation much easier.
Final Steps
Once all the hinges have been placed on the cabinet doors, it is time to take the final steps in the installation process. These steps are the same regardless of the type or size of the hinges, and include the installation of insert plugs and the fastening of screws.
This paragraph will detail how to do these steps properly so that the hinges will be securely installed in the cabinet doors.
Clean the Work Area
Before and after installing hinges on cabinet doors, it’s important to clean the work area to ensure that the hinges are properly secured and the doors can function smoothly.
Here are the steps to follow:
- Remove any tools or hardware from the work area to create a clean and clutter-free work surface.
- Use a damp microfiber cloth to wipe down the cabinet doors and the surrounding area to remove any dust, debris, or grease that may have accumulated.
- Dry the area thoroughly with a clean cloth to avoid any moisture damage to the wood or hardware.
- After installing the hinges, use a soft-bristled paintbrush to remove any sawdust or wood shavings that may have gotten stuck in the crevices.
Keeping your work area clean is crucial for completing any DIY project effectively and efficiently.
Pro Tip: To ensure a flawless finish of the cabinets, wipe them clean with a dry and lint-free cloth before painting them.
Dispose of any Unused Materials or Debris
After installing hinges on your cabinet doors, it’s essential to dispose of any unused materials or debris to ensure that your workspace is clean and clutter-free. This step is important for safety reasons and to make the installation process easier for future projects.
Here are some tips for disposing of unused materials and debris:
Gather all the leftover screws, nails, and other materials used during the installation process.
Use a separate container or bag for the debris created during the installation (e.g., sawdust, wood scraps).
Dispose of the materials and debris according to your local regulations.
Keeping a tidy workspace can help prevent accidents and keep your tools in good condition for future projects. Pro tip: Consider organising your tools and materials in a designated storage area for easy access and future use.
Enjoy your Newly Installed Cabinet Hinges.
After successfully installing hinges on your cabinet doors, it’s time to enjoy your newly updated cabinets!
Here are some final tips to ensure you get the most out of your new hinges:
Test the door swing: Open and close each cabinet door to make sure it swings smoothly and aligns with the frame.
Adjust as needed: If the door is not hanging level or rubbing against the frame, use the screw adjusters on the hinges to make small changes until it is aligned.
Keep hinges clean: Regularly dust and wipe down your hinges to prevent grime buildup and ensure they continue to function properly over time.
Now, sit back and admire your handiwork – there’s nothing quite like the satisfaction of a DIY home improvement project!